Stretching not only improves appearance, lengthens muscles, and gives that lean, toned look on stage, but it also improves fitness and health. It is the ultimate for preventing injuries.
Get huge shoulders! Here is a great shoulder workout, exercise descriptions and pics, and much more.
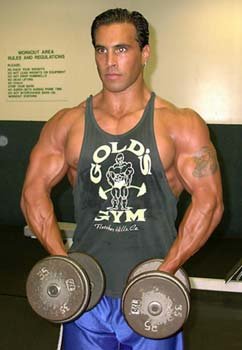
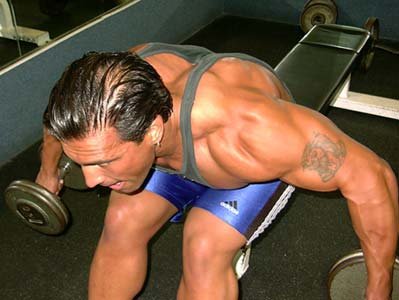
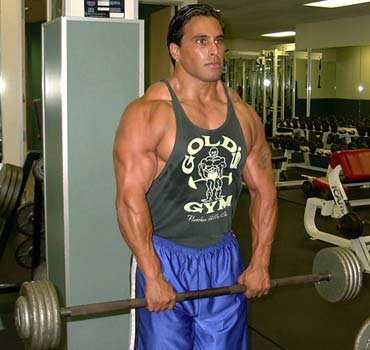
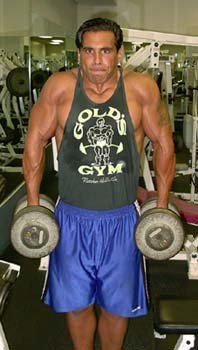
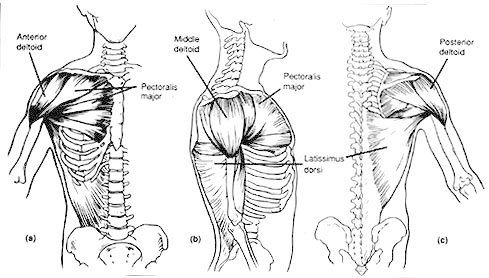
The "V-Taper" is a defining characteristic in any great physique. Wide up top with a narrow waist. Now that is what I am talking about - What about you? Mostly associated with a wide back it is important to realize that the "V-Taper" starts up top with wide shoulders. The wider your shoulders are, the narrower the waist will appear. Do you FEEL ME? Bet. The deltoid (shoulder) is a large three-headed muscle group consisting of the anterior (front), medial (side) and posterior (rear) deltoid. Click here for a drawing. The basic function of the deltoid muscle is to rotate and lift the arm. In order to develop massive, round CANNON BALL DELTS all three heads of the shoulder must be fully developed. It is also important to develop the trapezius muscle as well since they extend down from the neck, to down between the shoulder blades. Shoulder training involves two types of exercise; presses and raises. The following routine is designed for over-all development of the deltoids and trapezius muscles. Although very basic, it is a foolproof way to get development up top. It is the very routine that has given me the development I have today, and it will work for you! So let's get down to business. Lets get "IN THE TRENCHES"! SEATED DUMBBELL PRESSES The purpose of this exercise is to add mass and fully develop the shoulder muscles. Since this is the primary mass building movement in this routine, it is best to start your workout with this exercise. The beginning of your workout is when you are the freshest and have the most energy. This will allow you to handle the heaviest weight possible with the most intensity and focus. I prefer dumbbell presses to other pressing exercises for a couple of reasons. With dumbbell presses you get a greater range of motion for overall development and each shoulder is working individually maximizing the effort put out by both shoulders completely. Also, doing presses with barbell's to the front over emphasize the anterior delts and upper chest while presses behind the neck using a barbell put a lot of stress on the shoulder joint risking injury. Perform this exercise on a workout chair that has back support. Make sure that your lower back is supported up against the chair throughout the entire movement. Begin the exercise with one dumbbell in each hand, slightly above shoulder level. Your elbows should be out to the side and the palms of your hands should be facing forward, Press the dumbbell's over your head until the dumbbells almost touch and then lower the dumbbells back to the starting position. Maintain control of the weights throughout the entire movement, taking about 1-? seconds to lower the weight and then just explode up. Perform one warm-up set of about 15 to 20 repetitions. Do 4 working sets of 12,10,8 and 6 repetitions, increasing the weight on each successive set. Beginners should only do 3 sets of 10 repetitions. SIDE DUMBBELL LATERAL RAISES Next in the pecking order are side lateral raises. Side lateral raises develop the medial head of the deltoid. The anterior and posterior deltoid also comes into play in this movement as well the trapezius (to a much lesser degree). This exercise is great for capping the delts, giving them a nice round look from the front. Stand upright with your feet planted firmly on the ground about shoulder width apart and with your knees slightly bent. With a dumbbell in each hand, let your arms hang in front of your body with the palms facing each other. Using your shoulders, lift your arms up and out away from your body until your hands are at shoulder level or slightly higher. Turn the wrists slightly, as if pouring water out of a pitcher on the top of the movement to further stress and isolate the medial head of the deltoid. The rear of the dumbbells should be higher than the front, or your pinkies should be higher than thumbs. At the end of the movement your arms should somewhat resemble a "T". Pause very briefly at the top and then lower your arms back to the starting position under control and blast through your set. Most people consider this a shaping movement. And it is, but you should still go heavy if you are trying to build size, side lateral raises are an effective mass builder as well. You should perform 3 to 4 working sets for about 8 to 10 repetitions with the heaviest weight you can handle with proper form. Beginners should perform 2 to 3 sets for 10 repetitions. SEATED DUMBBELL LATERALS Seated dumbbell laterals are next. By now you should have a good pump. I prefer the seated version of bent-over laterals to lessen the strain on the lower back. Plus, doing bent-over dumbbell laterals in a seated fashion allows you to do a stricter movement than when standing. Sit on the end of a bench with a dumbbell in each hand. Bend forward at the waist and bring the dumbbells behind your calves with the palms of your each hand facing each other. Keep your head up and your body steady and your arms slightly bent. Then raise the weight up and out to the side. Make sure to use very strict form on this exercise. It is very easy to cheat and just swing through the motions. Feel each contraction in the rear delts at the top of the movement and squeeze. Lower the weight under control back to the starting position and then continue with the rest of the set. Perform 3 to 4 sets for 10 to 12 repetitions. Beginners should do 2 to 3 sets for 10 reps. UPRIGHT BARBELL ROWS This exercise develops the trapezius muscles, but it also helps to work the anterior, medial and posterior delts. OK, by now you are totally pumped (no pun intended). This exercise will help tie in your entire shoulders with your traps and it is great for overall development of the shoulders and traps. This exercise can be performed on a cable pulley as well as with dumbbells, but for overall development nothing beats the barbell version of this exercise. Stand upright with your feet firmly planted on the ground approximately shoulder width apart. Take a hold of a barbell with an overhand grip and let the bar hang down in front of your thighs. Your hands should be approximately 10 inches apart. Keeping the bar close to your body, lift it straight up until it is underneath your chin and really focus on the contraction by bringing your elbow up and back. Lower the weight to the starting position under control and feel the stretch. Perform 3 sets of 8 to 12 repetitions. Beginners should do 2 sets of 10 reps. DUMBBELL SHRUGS Dumbbell shrugs develop the trapezius muscles and add mass and density to the trapezius. I prefer the dumbbell version of this exercise to the barbell because with a barbell your thighs and JOHNSON sometimes get in the way preventing the desired form and range of motion for overall development. Stand in an upright position with your knees slightly bent and your feet shoulder width apart. With the heaviest dumbbell you can handle in each hand and your arms at your sides basically just shrug or raise your shoulders directly up, almost as if you were trying to pinch your ears. Hold and squeeze at the top of the movement and let your arms hang down back to the starting position. Do not roll your shoulders in a circular motion. Just shrug your shoulder up and down like a piston!
How to Get Big Forearms
Forearms, along with abs, neck and lower back, are one of the most neglected body parts by the average gym-goer. Even worse, professional bodybuilders, who are supposed to present the total package of musculature, often don't work forearms. Why is it that nobody seems to care about this extremely important body part? Hopefully I will be able to convince you that forearms are just as important to exercise as chest or legs.
Forearms: Anatomy
Two bones make up the forearm area: the ulna and radius. When the arm is at its side and the hand is supinated (palm facing forward), the ulna is the bone running along the inside of the arm (the medial bone) and the radius is running along the outside (the lateral bone). The proximal (close to the body) joint of the ulna is at the upper arm bone (humerus) at the medial epicondyle (the bony prominence at the end of the humerus on the inside of the arm), and the radius connects at the corresponding lateral epicondyle (the outside prominence) of the humerus. At the distal (far from the body) joint of the forearm, the ulna and radius connect through a series of ligaments to the eight carpal bones of the hand (Lunate, Triquertrum, Pisiform, Hamate, Scaphoid, Capitate, Trapezoid, Trapezium). The musculature of the forearm consists of an amazing amount of muscles. The main pronators (turning palm from facing forward to facing backward) of the forearm are the Pronator Quadratus and the Pronator Teres. The major supinating muscles (turnng palm from backwards to forwards) are the supinator and the biceps brachii muscles. The forearm also contains abductor and adductor muscles (laterally moving the hand outwards and inwards), flexor and extensor muscles (flexing the hand inwards and extending it outwards), and flexors and extensors of the fingers and thumbs.
Forearm Training and Exercises
Reverse Curl:
Take the barbell and hold it down at your thighs, gripping it a shoulder’s length or perhaps an inch or two narrower. Make sure that you have a reverse grip, which means that your palms are facing away from you, not toward you. Keeping your elbows locked into your sides, slowly lift the bar toward your torso.
You should stop when your forearms are completely contracted, which means that your hands should be across from your shoulders. Slowly let the weight bring your arms back to the starting position – down at your legs – while you squeeze your forearm muscles during the negative motion. Try 8-10 reps for three sets.
Barbell Wrist Curls:
This exercise is more effective from a seated position. Sitting on a bench, take the barbell into your hands with your palms facing upward. Make sure that your hands are together during this exercise, maybe a half inch between them. Also, your elbows should be locked to the insides of your knees. With the weight on your fingertips, your hands should be pointing toward the floor as your wrist forms an angle of almost 90 degrees.
Then, roll your hands upward, as the bar gradually rolls into your palms, until your wrists are straight and no longer bent downward. Squeeze the forearms throughout the entire range of motion. Slowly allow the weight to bring your hands back down to the starting position. Repeat the motion, doing 8-10 repetitions for a set of three.
Reverse Barbell Wrist Curls:
This exercise is practically identical to the barbell wrist curls (above) with one exception. The palms are facing downward instead of upward. Sit on the bench and lock you elbows inside your knees. The weight should be down at your fingertips and your wrists bent toward the floor. Slowly roll the weight into your palms, lifting the weight upward, squeezing the forearm muscles the entire time. Bring your wrists up as far as they’ll go, and then slowly bring the weight down to the starting position. These should really burn! Try three sets of 8-10 reps.

 Who should stretch?
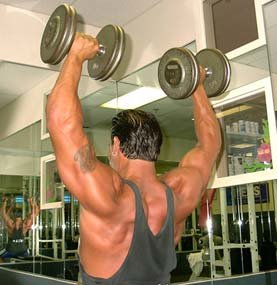